- Preparation Time: 10 minutes
- Cooking Time: 15 minutes
- Total Time: 25 minutes
- Servings: 2 sandwiches
Ingredients
For the Sandwiches
- 4 slices sourdough bread or sandwich bread
- 1 medium yellow onion, thinly sliced
- 2 tablespoons butter
- 1 tablespoon olive oil
- 1 1/2 cups shredded cheddar cheese
- 4 slices mozzarella cheese
- 1/2 teaspoon garlic powder
- 1/2 teaspoon black pepper
- Pinch of salt
Optional Additions
- Cooked bacon
- Tomato slices
- Jalapeños
- Parmesan cheese
- Fresh parsley
Kitchen Equipment Needed
- Air fryer
- Frying pan or skillet
- Spatula
- Knife and cutting board
- Mixing spoon
Step-by-Step Instructions
Step 1: Caramelize the Onions
Heat olive oil and 1 tablespoon butter in a skillet over medium-low heat.
Add the sliced onions and stir gently.
Cook the onions slowly for 10 to 12 minutes until soft, golden, and caramelized.
Cooking Intensity
- Heat Level: Medium-low
- Cooking Time: 10–12 minutes
- Texture Goal: Soft, sweet, golden-brown onions
Stir occasionally to prevent burning. Slow cooking helps release the natural sweetness of the onions.
Step 2: Prepare the Bread
Spread the remaining butter evenly on one side of each bread slice.
The buttered side will become crispy and golden in the air fryer.
Sprinkle a little garlic powder and black pepper onto the buttered bread for extra flavor.
Step 3: Assemble the Sandwiches
Place two slices of bread butter-side down on a clean surface.
Layer each sandwich with:
- Shredded cheddar cheese
- Mozzarella cheese
- Caramelized onions
Top with the remaining bread slices, keeping the buttered side facing outward.
Texture Goal
- Thick cheesy filling
- Even onion distribution
- Fully covered bread edges
This helps the cheese melt evenly during cooking.
Step 4: Preheat the Air Fryer
Preheat your air fryer to 370°F (188°C) for 2 to 3 minutes.
Preheating ensures even cooking and crispy bread.
Step 5: Air Fry the Sandwiches
Place the sandwiches into the air fryer basket in a single layer.
Cook for 4 to 5 minutes on one side.
Carefully flip the sandwiches and cook for another 3 to 4 minutes until golden brown and crispy.
Air Frying Intensity
- Temperature: 370°F (188°C)
- Cooking Time: 7–9 minutes total
- Texture Goal: Crispy golden bread with melted cheese center
The sandwiches should look deeply golden with bubbling melted cheese inside.
Step 6: Cool Slightly and Serve
Remove the sandwiches carefully from the air fryer and allow them to rest for 1 to 2 minutes.
Slice diagonally and serve warm.
The short resting time helps the melted cheese settle slightly for easier slicing.
Tips for the Best Air Fryer Onion Grilled Cheese
Use Good Quality Bread
Thicker bread like sourdough gives the sandwich a crispy exterior while holding the filling well.
Cook Onions Slowly
Caramelized onions develop their sweetness through slow cooking. Avoid rushing this step.
Don’t Overfill
Too much cheese or onions may spill out during cooking.
Flip Carefully
Use a spatula to gently flip the sandwiches without breaking them apart.
Cheese Options
This recipe works with many cheeses.
Best Cheese Choices
- Cheddar
- Mozzarella
- Swiss
- Monterey Jack
- Provolone
- Gouda
Mixing cheeses creates better flavor and melt quality.
Flavor Variations
You can customize this grilled cheese recipe easily.
Add Bacon
Crispy bacon adds smoky flavor and crunch.
Make It Spicy
Add jalapeños or red pepper flakes.
Add Herbs
Fresh thyme or parsley adds freshness.
Extra Crispy Version
Sprinkle parmesan cheese on the outside of the bread before air frying.
What to Serve with Air Fryer Onion Grilled Cheese
This sandwich pairs perfectly with:
- Tomato soup
- French fries
- Potato wedges
- Side salad
- Roasted vegetables
- Pickles
It also makes a great snack with dipping sauces.
Storage Instructions
Grilled cheese tastes best fresh, but leftovers can be stored properly.
- Refrigerator: Up to 2 days
- Reheating: Air fry at 350°F for 3–4 minutes
Avoid microwaving because the bread may become soggy.
Common Mistakes to Avoid
Cooking at Very High Heat
High temperatures can burn the bread before the cheese melts fully.
Skipping Preheating
Preheating helps create evenly crisp sandwiches.
Using Too Much Filling
Overstuffed sandwiches may cook unevenly.
Why This Recipe Works
The air fryer creates a perfectly crisp outer layer while melting the cheese evenly inside. Caramelized onions bring rich sweetness that balances the savory cheese and buttery bread beautifully.
Using two types of cheese adds both flavor and stretchiness, giving the sandwich a classic restaurant-style texture.
Nutrition Information (Per Serving)
| Nutrient | Amount |
|---|---|
| Calories | 520 kcal |
| Protein | 22 g |
| Fat | 34 g |
| Saturated Fat | 18 g |
| Carbohydrates | 30 g |
| Fiber | 3 g |
| Sugar | 5 g |
| Sodium | 780 mg |
Final Thoughts
Air Fryer Onion Grilled Cheese is a simple yet incredibly flavorful comfort food recipe that combines crispy bread, gooey cheese, and sweet caramelized onions into one satisfying sandwich.
The air fryer makes preparation quick and easy while delivering perfectly golden results every time. Whether you enjoy it for lunch, dinner, or a late-night snack, this cheesy sandwich is guaranteed to become a household favorite.
Once you try this crispy and cheesy recipe, you will never want ordinary grilled cheese again.
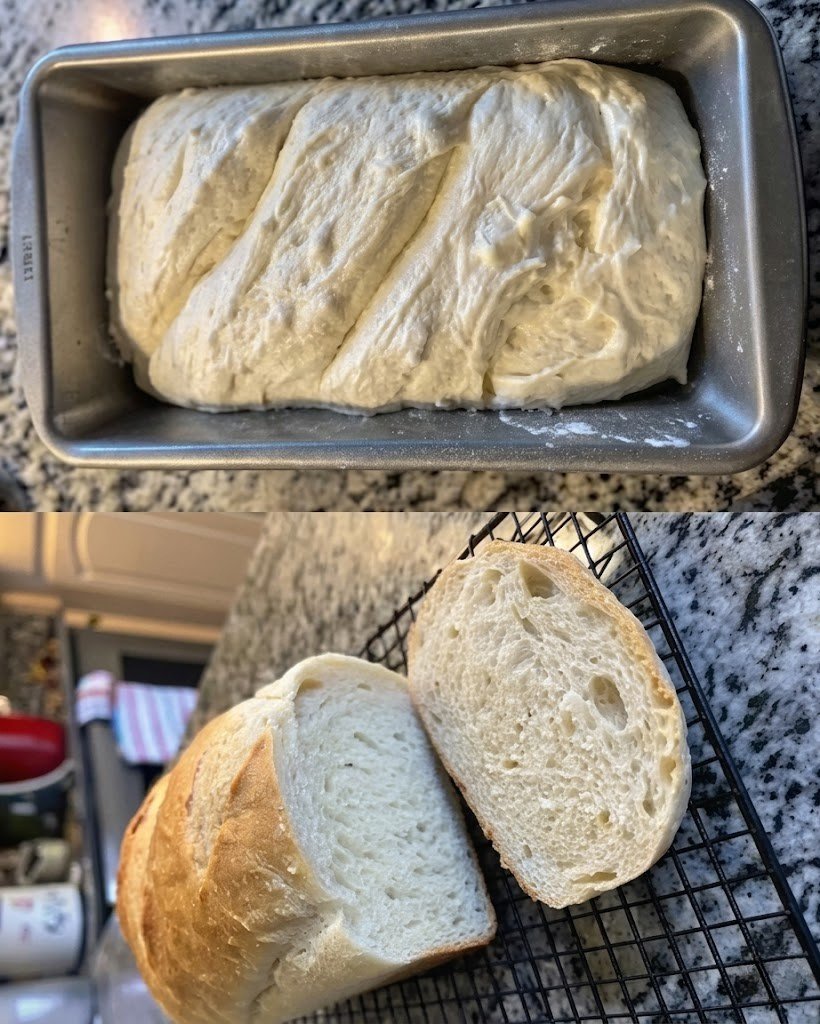
Soft Sourdough Sandwich Bread Recipe
Soft and Fluffy Homemade Sourdough Sandwich Bread
Soft Sourdough Sandwich Bread is the perfect homemade loaf for everyday meals, sandwiches, toast, and breakfast recipes. Unlike traditional artisan sourdough bread with a thick crust, this sandwich bread is soft, fluffy, and tender with a light golden crust. It combines the rich flavor of sourdough starter with the soft texture of classic sandwich bread, making it ideal for the whole family.
This recipe is excellent for beginners and experienced bakers alike. The sourdough starter gives the bread a delicious depth of flavor while helping create a soft and moist crumb that stays fresh for days. Whether you use it for grilled cheese, French toast, lunch sandwiches, or morning toast with butter, this bread is versatile and comforting.
Making sourdough sandwich bread at home may seem complicated, but with the right timing and techniques, it becomes simple and rewarding. The aroma of freshly baked bread filling your kitchen is worth every step.
Why You Will Love This Recipe
- Soft and fluffy texture
- Rich homemade sourdough flavor
- Perfect for sandwiches and toast
- Easy step-by-step instructions
- Stays soft for several days
- Great use for active sourdough starter
Recipe Information
- Recipe Name: Soft Sourdough Sandwich Bread
- Cuisine: American
- Course: Bread
- Difficulty Level: Medium
- Preparation Time: 25 minutes
- First Rise Time: 6–8 hours
- Second Rise Time: 2 hours
- Bake Time: 35 minutes
- Total Time: Approximately 9–11 hours
- Servings: 12 slices
Ingredients
For the Bread Dough
- 1 cup active sourdough starter
- 1 cup warm milk
- 2 tablespoons honey or sugar
- 3 tablespoons softened butter
- 3 cups bread flour
- 1 teaspoon salt
Optional Topping
- Melted butter for brushing
- Oats or sesame seeds
Kitchen Equipment Needed
- Large mixing bowl
- Stand mixer with dough hook (optional)
- Measuring cups and spoons
- Loaf pan
- Kitchen towel or plastic wrap
- Cooling rack
Step-by-Step Instructions
Step 1: Activate the Wet Ingredients
In a large mixing bowl, combine:
- Active sourdough starter
- Warm milk
- Honey or sugar
- Softened butter
Mix until smooth and well combined.
Mixing Intensity
- Temperature: Warm but not hot milk
- Mixing Time: 2–3 minutes
- Texture Goal: Smooth creamy mixture
Warm ingredients help activate fermentation and improve dough softness.
Step 2: Add the Flour and Salt
Gradually add bread flour and salt into the wet mixture.
Mix using a spoon or stand mixer until a rough dough forms.
Dough Texture Goal
- Slightly sticky
- Soft but manageable
- Fully combined without dry flour
Do not add too much extra flour because softer dough creates softer bread.
Step 3: Knead the Dough
Transfer the dough onto a lightly floured surface and knead for 8 to 10 minutes.
If using a stand mixer, knead with a dough hook for 6 to 7 minutes on medium speed.
Kneading Intensity
- Kneading Time: 8–10 minutes
- Texture Goal: Smooth, elastic dough
- Elasticity Test: Dough stretches without tearing easily
Proper kneading develops gluten, giving the bread structure and softness.
Step 4: First Rise (Bulk Fermentation)
Place the dough into a lightly greased bowl.
Cover with plastic wrap or a towel and let rise at room temperature for 6 to 8 hours or until doubled in size.
Rising Intensity
- Temperature: Warm room temperature
- Rise Time: 6–8 hours
- Texture Goal: Puffy doubled dough
Fermentation time may vary depending on room temperature and starter strength.
Step 5: Shape the Dough
Punch down the dough gently to release excess air.
Shape it into a loaf by rolling the dough tightly.
Place the shaped dough into a greased loaf pan.
Shaping Goal
- Smooth surface
- Tight loaf shape
- Even structure for slicing
This step helps create a classic sandwich bread shape.
Step 6: Second Rise
Cover the loaf pan loosely and allow the dough to rise again for 1 1/2 to 2 hours.
The dough should rise slightly above the edge of the loaf pan.
Rising Intensity
- Temperature: Warm environment
- Rise Time: 1 1/2–2 hours
- Texture Goal: Light and airy dough
Avoid over-proofing because the bread may collapse during baking.
Step 7: Preheat the Oven
Preheat your oven to 375°F (190°C).
If desired, brush the top of the dough with melted butter for a softer crust.
Step 8: Bake the Bread
Bake the loaf for 35 to 40 minutes until golden brown.
The bread should sound hollow when tapped on the bottom.
Baking Intensity
- Oven Temperature: 375°F (190°C)
- Bake Time: 35–40 minutes
- Texture Goal: Golden crust with soft fluffy interior
If the top browns too quickly, cover loosely with foil during the last 10 minutes.
Step 9: Cool the Bread
Remove the loaf from the pan immediately after baking.
Allow the bread to cool completely on a wire rack before slicing.
Cooling Goal
- Prevent soggy texture
- Maintain soft crumb
- Easier slicing
Cutting too early may compress the bread.
Tips for the Best Soft Sourdough Sandwich Bread
Use Active Starter
An active bubbly starter creates better rise and softer texture.
Avoid Too Much Flour
Sticky dough often creates softer bread after baking.
Use Bread Flour
Bread flour develops stronger gluten for better structure and chew.
Brush with Butter
Brushing melted butter over the crust keeps it soft and flavorful.
Flavor Variations
This recipe can be customized easily.
Honey Wheat Version
Replace part of the bread flour with whole wheat flour.
Herb Bread
Add dried herbs like rosemary or oregano.
Cheesy Bread
Mix shredded cheddar cheese into the dough.
Seeded Bread
Top with sesame seeds, flaxseeds, or oats.
What to Serve with Soft Sourdough Sandwich Bread
This bread pairs perfectly with:
- Butter and jam
- Soups and stews
- Grilled cheese sandwiches
- Peanut butter
- Eggs and breakfast dishes
- Turkey or chicken sandwiches
It is one of the most versatile homemade breads you can bake.
Storage Instructions
Store bread in a sealed bread bag or airtight container.
- Room Temperature: Up to 4 days
- Freezer: Up to 2 months
Slice before freezing for easy use later.
Common Mistakes to Avoid
Underproofing the Dough
Insufficient rise time can create dense bread.
Overproofing
Over-risen dough may collapse while baking.
Slicing While Hot
Warm bread can become gummy when sliced too early.
Why This Recipe Works
The sourdough starter naturally ferments the dough, adding flavor and improving texture. Butter and milk enrich the dough, making the bread softer than traditional rustic sourdough loaves.
The two-rise process creates an airy structure while maintaining a tender crumb perfect for sandwiches and toast.
Nutrition Information (Per Slice)
| Nutrient | Amount |
|---|---|
| Calories | 180 kcal |
| Protein | 5 g |
| Fat | 4 g |
| Saturated Fat | 2 g |
| Carbohydrates | 30 g |
| Fiber | 1 g |
| Sugar | 3 g |
| Sodium | 210 mg |