-
Prep Time: 25 minutes
-
Cook Time: 1 hour 15 minutes
-
Total Time: 1 hour 40 minutes
-
Yield: 8 generous servings (approx. 12 cups total)
-
Difficulty Level: Intermediate (requires heat management and flavor layering)
Culinary Intensity Profile
Cooking is as much about managing energy and temperature as it is about combining ingredients. This breakdown helps you anticipate the shifting heat levels required throughout the process:
-
Prep Work (Low Intensity): Slicing, dicing, and measuring ingredients before turning on the stove.
-
Searing & Sautéing (High Intensity): Active, high-heat engagement to brown the beef and caramelize the aromatics, building the soup’s foundational flavor.
-
Simmering (Low-to-Medium Intensity): A gentle, hands-off phase where low heat slowly breaks down the collagen in the beef, rendering it melt-in-your-mouth tender.
-
Finishing (Medium Intensity): Final seasoning adjustments, balancing acidity, and ensuring the final vegetables reach the perfect texture.
Ingredients
The Beef & Aromatics
-
2 lbs (900g) Beef chuck roast, trimmed of excess fat and cut into 3/4-inch cubes
-
2 tbsp Olive oil or avocado oil (divided)
-
1 large Yellow onion, finely diced
-
4 cloves Garlic, minced
-
3 medium Celery stalks, diced
The Liquids & Base
-
6 cups Low-sodium, high-quality beef bone broth
-
1 can (28 oz) Crushed tomatoes (preferably San Marzano)
-
2 tbsp Tomato paste
-
2 tbsp Worcestershire sauce
-
2 Whole bay leaves
-
1 tbsp Italian seasoning (thyme, oregano, rosemary blend)
-
Salt and freshly cracked black pepper to taste
The Garden Vegetables
-
3 medium Russet or Yukon Gold potatoes, peeled and cubed into 1/2-inch pieces
-
3 medium Carrots, sliced into 1/4-inch rounds
-
1.5 cups Fresh or frozen cut green beans
-
1 cup Sweet corn kernels (fresh, canned, or frozen)
-
1 cup Green peas (fresh or frozen)
Step-by-Step Instructions
Step 1: Sear the Beef (High Intensity)
-
Pat the cubed beef chuck roast completely dry with paper towels. Season generously on all sides with salt and freshly cracked black pepper. Dry meat sears; wet meat steams.
-
Heat 1 tablespoon of oil in a large, heavy-bottomed Dutch oven or stockpot over medium-high heat until shimmering.
-
Working in batches to avoid crowding the pan, add the beef cubes. Sear for 2 to 3 minutes per side until a deep, golden-brown crust forms.
-
Transfer the browned beef to a side plate, leaving the rendered fat and browned bits (the fond) in the bottom of the pot.
Step 2: Build the Aromatic Base (Medium Intensity)
-
Turn the heat down to medium. Add the remaining tablespoon of oil to the pot if it looks dry.
-
Toss in the diced onion and celery. Cook for 5 to 6 minutes, stirring frequently, until the onions turn translucent and soft.
-
Add the minced garlic and tomato paste. Stir constantly for 1 to 2 minutes. You want the tomato paste to darken to a rich, brick-red color, which sweetens it and removes the raw metallic taste.
Step 3: Deglaze and Simmer (Low Intensity)
-
Pour in about 1 cup of the beef broth. Use a wooden spoon to vigorously scrape up all the delicious, caramelized browned bits stuck to the bottom of the pot.
-
Pour in the remaining beef broth, crushed tomatoes, Worcestershire sauce, Italian seasoning, and bay leaves.
-
Return the seared beef and any collected juices back into the pot. Bring the liquid to a rolling boil, then immediately drop the heat down to low.
-
Cover with a tight-fitting lid and let it simmer gently for 45 to 50 minutes, or until the beef is notably tender.
Step 4: Add the Root Vegetables (Medium Intensity)
-
Stir in the cubed potatoes and sliced carrots.
-
Keep the pot partially covered and continue simmering over low-medium heat for an additional 15 to 20 minutes, until the potatoes and carrots can be easily pierced with a fork.
Step 5: The Final Fold (Low Intensity)
-
Stir in the green beans, corn, and peas. Because these vegetables cook quickly, they only need about 5 to 7 minutes in the simmering broth to heat through while retaining their bright colors and crisp textures.
-
Remove the pot from the heat. Fish out and discard the two bay leaves.
-
Taste the broth. Adjust the seasoning with a touch more salt, pepper, or a splash of Worcestershire sauce if desired. Let the soup rest for 5 minutes before serving so the flavors settle.
Shelf Life, Storage, and Canning
Refrigeration
Allow the soup to cool completely to room temperature before transferring it to airtight containers. It keeps beautifully in the refrigerator for up to 4 to 5 days. In fact, the flavor often improves on day two as the ingredients continue to marry.
Freezing
This soup freezes exceptionally well for up to 3 months. If you plan to freeze the entire batch, consider undercooking the potatoes slightly during the initial prep so they do not turn mushy upon thawing. Thaw overnight in the fridge and reheat gently on the stovetop.
Pressure Canning (For Long-Term Storage)
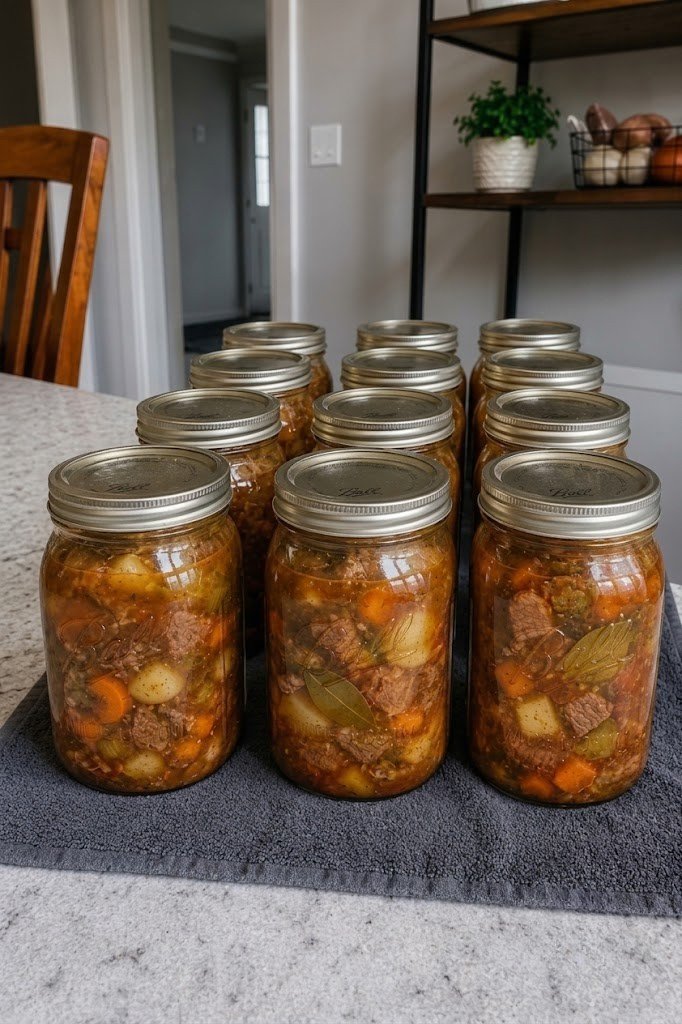
If you wish to preserve your soup in jars as pictured above, you must use a pressure canner because beef and vegetables are low-acid foods. Note: Do not add thickeners, cornstarch, or dairy if canning.
-
Ladle the hot soup into sterilized, hot quart or pint jars, ensuring an equal distribution of beef, vegetables, and liquid. Leave exactly 1 inch of headspace at the top.
-
Wipe the rims clean with a damp paper towel, center the lids, and screw the bands on until finger-tight.
-
Process in a pressure canner according to your altitude and manufacturer instructions (typically 75 minutes for pints and 90 minutes for quarts at 10–11 lbs of pressure). Allow the canner to depressurize naturally before removing the jars.
Nutrition Facts
Values are calculated per serving (1.5 cups / approx. one-eighth of the total batch).
-
Calories: 310 kcal
-
Total Fat: 11g
-
Saturated Fat: 4g
-
-
Cholesterol: 75mg
-
Sodium: 620mg (dependent on broth brand)
-
Total Carbohydrates: 22g
-
Dietary Fiber: 4g
-
Sugars: 6g
-
-
Protein: 28g
-
Vitamin A: 90% DV
-
Vitamin C: 25% DV
-
Iron: 20% DV
-
Potassium: 740mg