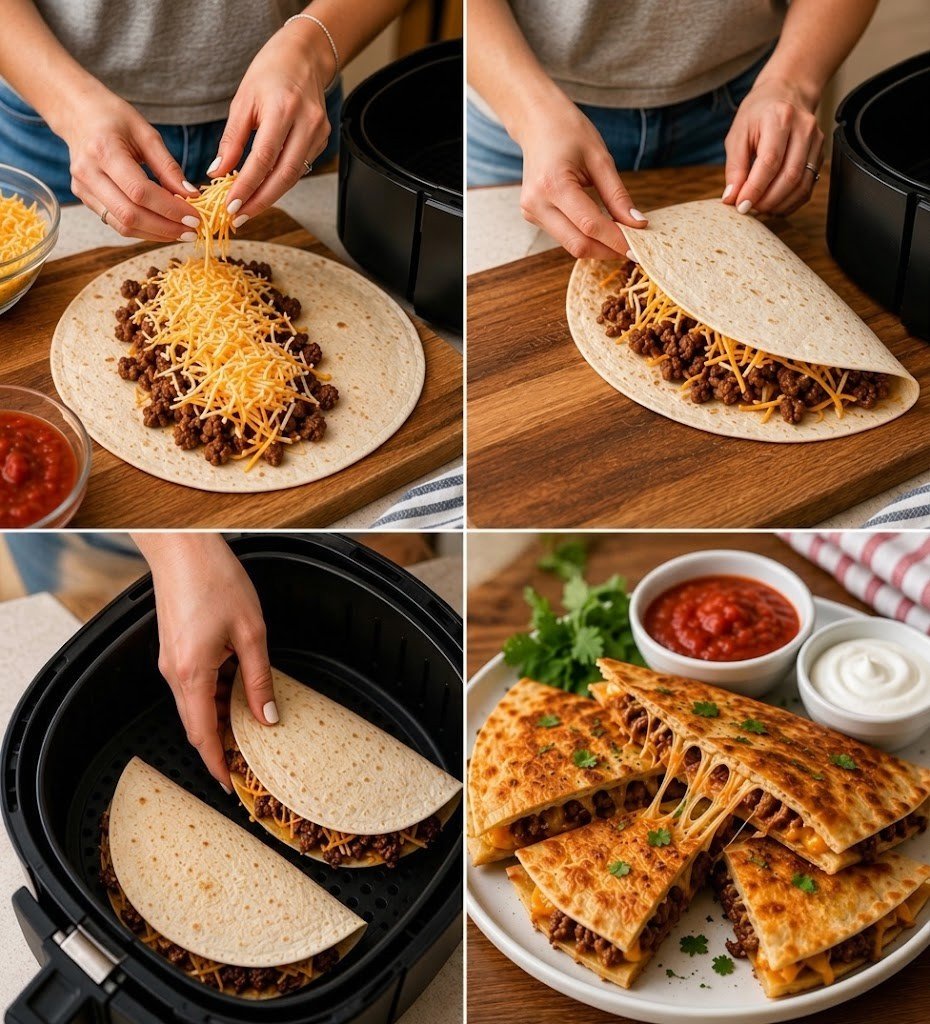
-
Prep Time: 15 minutes
-
Cook Time: 8 to 10 minutes per batch
-
Total Time: 25 minutes
-
Cooking Intensity / Difficulty: Easy (Beginner-friendly)
-
Heat Setting: High Air Fry Intensity ($375^\circ\text{F}$ / $190^\circ\text{C}$)
-
Course: Main Dish / Casual Dining
-
Cuisine: Tex-Mex / Mexican-American
-
Servings: 4 large quesadillas
Why the Air Fryer Changes the Game
-
Consistent Crunch: Unlike a skillet where hot spots can scorch sections of the tortilla, the air fryer circulates rapid super-heated air around the entire folded pocket, crisping it symmetrically.
-
Less Fat, More Flavor: You only need a ultra-light misting of oil spray to achieve a premium, deep-fried texture, letting the rich taco meat and sharp cheddar carry the profile.
-
Speed: From assembly to table, you can have a gourmet batch cooked in under 10 minutes.
Ingredients
To achieve that professional, photo-ready stretch and crisp crust, prioritize fresh fillings and high-quality cheese blends.
The Savory Meat Filling:
-
Ground Beef: 1 lb (85/15 lean ground beef strikes the perfect balance of richness without excess pooling grease).
-
Taco Seasoning: 1 packet (or 2 tablespoons of homemade mix: chili powder, cumin, garlic powder, onion powder, and oregano).
-
Water: $1/3$ cup (to bind the seasoning into a rich, glossy taco glaze).
The Wraps & Cheese Blend:
-
Flour Tortillas: 4 large (10-inch burrito size; flour holds up beautifully to air frying and turns incredibly flaky).
-
Shredded Cheddar & Monterey Jack Blend: 3 cups, freshly grated (a mix provides the perfect balance of sharp tang and maximum elasticity).
-
Olive Oil or Avocado Oil Spray: For coating the exteriors.
Optional Toppings & Dips:
-
Fresh Salsa or Pico de Gallo: 1 cup
-
Sour Cream or Mexican Crema: $1/2$ cup
-
Fresh Cilantro: 2 tablespoons, finely chopped for a pop of color.
Step-by-Step Instructions
Step 1: Cook and Season the Taco Beef
Place a skillet over medium-high heat. Add the ground beef and break it apart using a wooden spoon or spatula. Cook for 6 to 8 minutes until the meat is completely browned and no longer pink. Carefully drain away any excess grease from the pan. Reduce the heat to medium, pour in the taco seasoning along with $1/3$ cup of water, and stir thoroughly. Simmer for 2 to 3 minutes until the liquid reduces into a thick, clinging sauce that coats the beef perfectly. Remove from heat and let cool slightly.
Step 2: Assemble with Precision
Lay your flour tortillas flat on a clean cutting board or work surface. Mentally divide each tortilla in half.
-
The First Cheese Blanket: Scatter a generous handful of the shredded cheese mixture across one half of the tortilla.
-
The Savory Layer: Spoon an even layer of the seasoned taco beef directly over the cheese.
-
The Lock-In Cheese Layer: Cover the beef with another generous layer of cheese. This “double-cheese structure” acts as a culinary glue, holding the top and bottom of the tortilla securely to the filling as it air fries.
-
The Fold: Fold the empty half of the tortilla over the filling to create a tight, crescent moon shape. Press down firmly with your palm to compress the contents.
Step 3: Prep for Air Frying
Preheat your air fryer to $375^\circ\text{F}$ ($190^\circ\text{C}$) for 3 minutes. Lightly mist both sides of the assembled quesadillas with your olive oil or avocado oil spray. This step is vital for achieving that deep, professional golden-brown color and glassy crispness.
Step 4: The Air Fry Process
Carefully transfer the folded quesadillas into the air fryer basket. Depending on the size of your air fryer basket, you can comfortably fit one large or two medium quesadillas at a time without overlapping them.
Chef’s Pro-Tip: Because air fryers circulate air rapidly, the top flap of a tortilla can occasionally lift up early in the cooking cycle. To counter this, place a small, air-fryer-safe metal rack or a couple of toothpicks through the edges to weigh the flap down for the first 2 minutes until the cheese begins melting and glues it shut.
Air fry at $375^\circ\text{F}$ ($190^\circ\text{C}$) for 4 minutes, then carefully flip the quesadilla over using a wide spatula. Air fry for an additional 3 to 4 minutes on the second side. The final product should display a beautiful, rigid, golden-speckled crust with molten cheese bubbling gently out of the sides.
Step 5: Slice, Garnish, and Serve
Remove the quesadillas from the basket and place them on a cutting board. Let them rest for 1 to 2 minutes—this cooling window allows the cheese to set slightly so the fillings don’t slide out when cut. Using a sharp pizza cutter or chef’s knife, slice each crescent into three clean triangles. Arrange them elegantly on a platter alongside bowls of chilled sour cream, vibrant salsa, and a scatter of fresh cilantro.
Culinary Success Tips
-
Grate from the Block: Pre-packaged shredded cheese is coated in starches like cellulose to prevent clumping, which inhibits a smooth, stretchy melt. Shredding a block of cheese by hand ensures the ultimate commercial-quality “cheese pull.”
-
Don’t Overstuff: While a mountain of beef sounds appealing, overfilling will cause the ingredients to spill out into the air fryer basket, creating smoke and mess. Keep layers flat and even.
-
Keep Batches Warm: If cooking for a large crowd, place finished quesadillas on a wire rack over a baking sheet in a $200^\circ\text{F}$ ($95^\circ\text{C}$) conventional oven while you finish the remaining batches.
Nutrition Information
Estimated values per serving (1 large loaded quesadilla):
-
Calories: 640 kcal
-
Total Fat: 38g
-
Saturated Fat: 19g
-
Cholesterol: 115mg
-
Sodium: 1120mg
-
Total Carbohydrates: 32g
-
Dietary Fiber: 2g
-
Sugars: 1.5g
-
Protein: 42g